Would you rather have a different color on that bag a model carries in your photo? You can change the color of the bag without affecting any other color in the photo. You can do this by leveraging the powerful algorithm of Adobe Photoshop.
In the past, you had to employ some special skills from professional photo editors, but not anymore. These days, you can learn how to change the color of an object in Photoshop in a few steps.
You can also consider using an AI tool if you do not follow step-by-step guidelines. We will also share about this. First, here is how you can change the color of an object using Photoshop.
How to Change the Color of an Object in Photoshop
Adobe Photoshop is not just a photography tool; it is a design tool. Therefore, if you want to edit your photos, you might need to follow some simple steps to produce your desired results.
Here's what you need to do to change the color of an object using Adobe Photoshop.
Step One: Selecting the Object
First, open the photo with the object you need to change. Here's how our original photo looks before we change anything about it. In this tutorial, we aim to change the color of these boots.
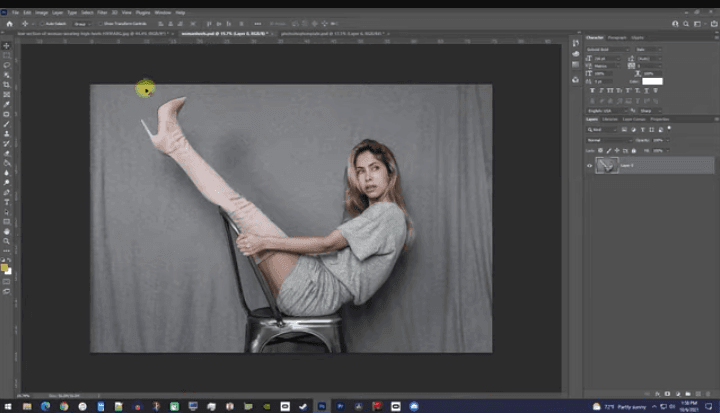
On the Toolbar, there is the Object Selection Tool. It allows you to only select the object that you want to change color on. If you use Adobe Photoshop 2022, you may need to turn off the object finder.

Move over to the object you want to change, and Photoshop will automatically select the object. However, the selection might not be perfect because it may touch on other objects that you do not intend to change color on. In the options bar, you will find the gear icon, and you can select it. Turn on the object subtract option, which is usually on by default.
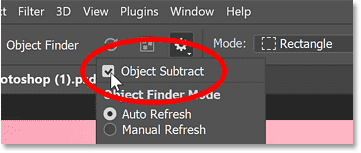
After you release the mouse button, the item will be subtracted from the item. Before you are done, clean out all other unwanted parts using this method.
Also, if there's a small part that you accidentally do, you can use the Shift key to include the parts. However, you may need to move to the options bar and change the tool's mode to lasso from the normal rectangular mode.
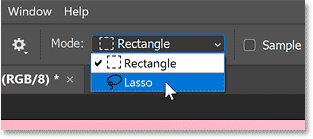
Some parts may have a low contrast, so stay in the area until Photoshop figures it out. To come out with perfect results, continue to clean out or add parts not in your selection or ones that are not in your selection when you need them to be.
Step Two: The Adjustment Layers
The selection part is always the hardest when learning how to change the color of an object in Photoshop. This is especially true if it is the first time to use the object selection tool on Adobe. The adjustment layers are now what you need to change the color of the object you want.
After you are satisfied with what you have selected, you can go over to the layer folder, which is on the far end bottom on your right. Here, you need to create a new group.

After you create a new group, the group will now appear above your image as Group 1.
Step Three: Converting the Selection into a Layer Mask
Now, for both the adjustment layers to be on the same layer mask, you need to add both of the adjustment layers to the group. Before you proceed, ensure that the group layer is selected. Your selection will still be active, and at this point, you can click on the Add Layer Mask icon.

Now, Photoshop will convert the selection we made into a group layer. You will see a white object, which is the object that you want to change the color. The black part is anything else that was not in the selection.
If you do not select the object well, you will see the unwanted parts on this layer. This is why you need to get the selection step well before you can proceed. However, if you got everything right, you can see it on this group layer.
At this point, any adjustment layers that you add to the group will only affect the selection you made.
Step Four: How Do I Selectively Change the Color of an Object in Photoshop? New Adjustment Layer
At this point, you need to click on the Create New Adjustment layer icon. You will then have a drop-down list with many options. You now need to click on a solid color.
At this point, you can select the color that you want your object to be in on the color picker. Here, you just need to select the color you want or match up with the color you want from the image.
For instance, if you want to match up with a color swatch you added earlier, you can use it. If you had a color swatch on a different object in the photo, you could just click on the object, and your choice of object would have that color. Otherwise, you can choose any color from the color picker.
Step Five: Colorize
Go back to the layers panel and click on the adjustment layer. This time, you need to choose the brightness/contrast. Since you do not want to change any brightness or contrast, you need to move the color fill layer above the bright/contrast layer.
Now, with the color fill layer still selected, click on the blending mode drop-down. Choose the color blending mode. This mode will automatically apply the hue and saturation of the color.
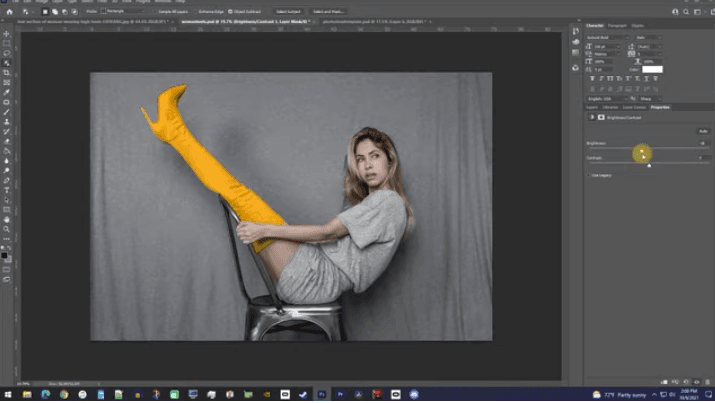
Step Six: Fix Texture and Shading
Back to the layers panel, choose the Create new adjustment layer, and choose levels. You will have five-level sliders. Here is where you will fix the brightness of the object.
Fixing the brightness will affect the texture and the shading, so ensure that you come up with the best texture and shading.
So that's how to change the color of an object in Photoshop.
What is the Shortcut to Change the Color of an Object in Photoshop?
In Photoshop, there's no other shortcut to change the image's color. You will need to follow the step-by-step guidelines we have shared above.
Enhancing Your Images Using Al Image Editor
After going through the Photoshop step-by-step process, you may end up with the changes you wanted. However, if you notice that your photo still has some quality issues, you can use the upscaler tool in the Al image editor to fix it.
The AI uses a powerful algorithm to give you a better-looking photo. It fixes the brightness, contrast, color balance, and sharpness of a photo.
You can also use other tools within the site, such as ClearOff and Outcut. ClearOff is used to remove any unwanted objects in a photo, while Outcut is designed to change the background of a photo.


