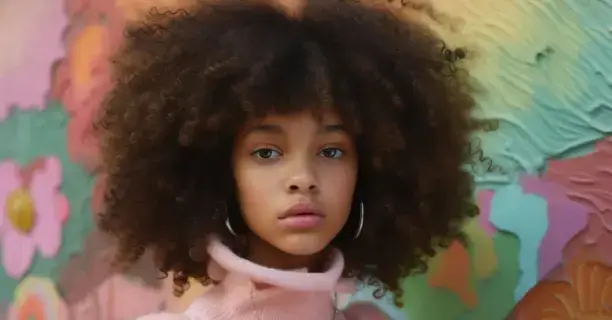
The first step is to ensure that you have Photoshop on your PC to enable the start of the face-swapping process. Once done, you can now follow the below step-by-step tutorial on how to swap faces using Photoshop.
Step 1: Choose Your Photos
By now, you should have the original photo and the face photo you want to work with. So, in this step, you need to open Photoshop and the files from your device.
To achieve better results, choose photos with faces facing the same direction. Be keen on the position of the shadows in each of your photos. Consider choosing photos with the least amount of shadows since they are easy to work with.
To do this, you can click CTRL +O on your Mac device. Alternatively, you can select file and then choose open in Photoshop to open the two files.
Step 2:Select the Face for Face Swap
The second step is to choose the face that you want to use for the face swap. After choosing the face photo and placing it on the right layer, you now need to select the parts of the face that you want to use.
There are many ways to do the selection, but the easiest one to use is the Lasso tool. You can find this tool on the left side of the Window on the toolbar.
You can also locate it by pressing the L button on your keyboard.
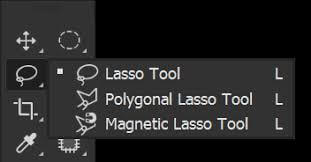
Using this tool, draw a rough outline around all the important features of the face. This could be the eyes, cheekbone, lips, eyes and eyebrows. If you decide on this type of selection, you need to avoid touching the hair.
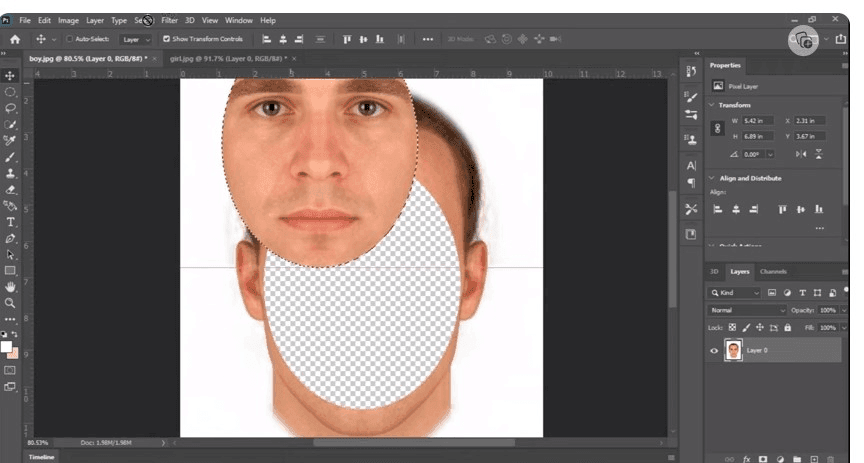
You might also consider a head swap, so in this case, you may need to highlight the whole head.
Step 3:Copy and Paste
You should now see a dotted line around where you highlighted the face. Now, it's time to copy the selected part of the photo. There are two ways to do this. You can click either CTRL + C or COMMAND +C on your Mac device.
Alternatively, you can choose Edit at the top of the Window and then select Copy from the drop-down list. Ensure that the line on the face is still blinking or flashing.
After copying, you need to paste the face on the body photo. You can use the CTRL +V option, or you can choose Edit on the top toolbar and then Paste from the drop-down list.
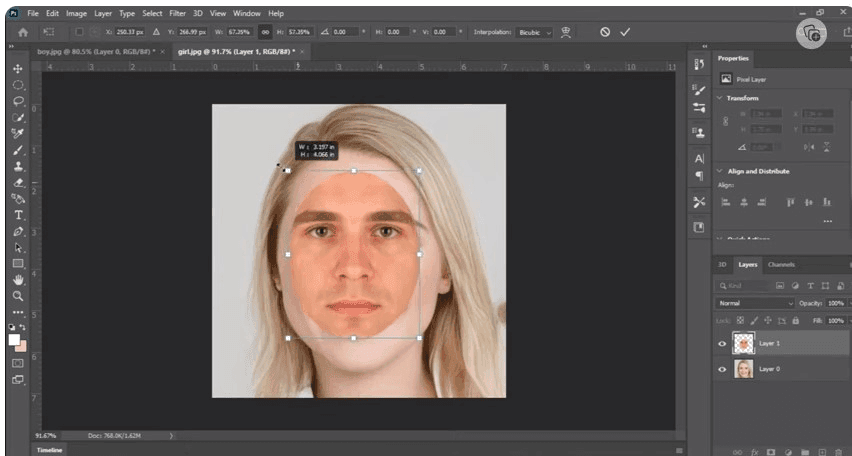
Now, the highlighted face may appear anywhere on your 'body photo.' To move it on the face of the body, you need to use the Move tool. You can find this tool on your toolbar on the left side of the Window.
Now, you need to move the face to roughly the same place as the face of the body. You can use the transform tool to resize and rotate the photo so that it aligns perfectly with your original photo.
Don't worry if it still doesn't seem okay. We will move on to blending out everything.
Step 4:Resize and Rotate the Face
Sometimes, you may not have the luxury of choosing a photo that looks in the same direction as the face of the body. Perhaps the only face you can access faces a different direction.
In this case, you need to use the transform tool to resize and rotate the face onto the face of the body effectively.
On the layers panel, you need to click on the Face layer. You can rename this layer Face. You can do this by double-clicking on the original name until it is ready for editing.
From the layers, you can see the Opacity option. On this option, reduce the capacity to 50%. By doing this, you can see both faces clearly.
On top of the Window, you will see the Edit button. Click on it and choose Transform, then Scale. You will now see a box on the face.
Now place your cursor on one corner of the box and hold the Shift key. Now drag the corner until the face is the same size as that of the body. The reduced opacity will help you properly align the features of the face onto the body.
You may need to rotate the face in the same direction as the face of the body. To do this, again select Edit from the top of the Window and select Transform, then Rotate. Now rotate the face until you get it in the same direction as the face of the body.
When satisfied with the resizing, you can press Enter on Windows or Return on Mac. Note that the two faces might not line up perfectly, so here, you need to use your best judgment on the best size and rotation.
Step 5:Copy the Background Layer
Now, the face-swapping technique in Photoshop is quite destructive to the original photo. You need to duplicate or copy the background layer before you do anything else. Doing this enables you to retain your original body for future touch-ups.
At this point, remember to return the Opacity level to 100%. Now, create a copy of the background layer, then create a mask and choose black as the main color.
By default, the layer mask is usually white. This makes the features on the top layer visible, while features on the bottom layer are invisible. Therefore, using the layer mask, you can easily determine what parts of the image will be visible.
Now click on your original photo's layer and click on CTRL +J on Windows or Command +J to copy the layer. You can now hide the original photo's layer by clicking on the eye icon.
Step 6:Blend Everything Well
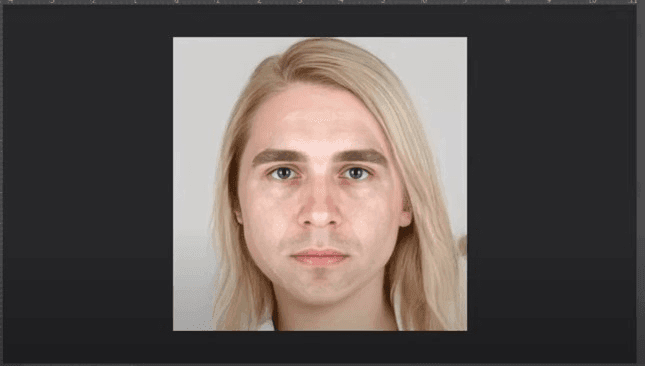
To have the best results, you need to blend everything well. To start blending, you need to toggle the eye icon, which opens up the visibility of both the body and the face.
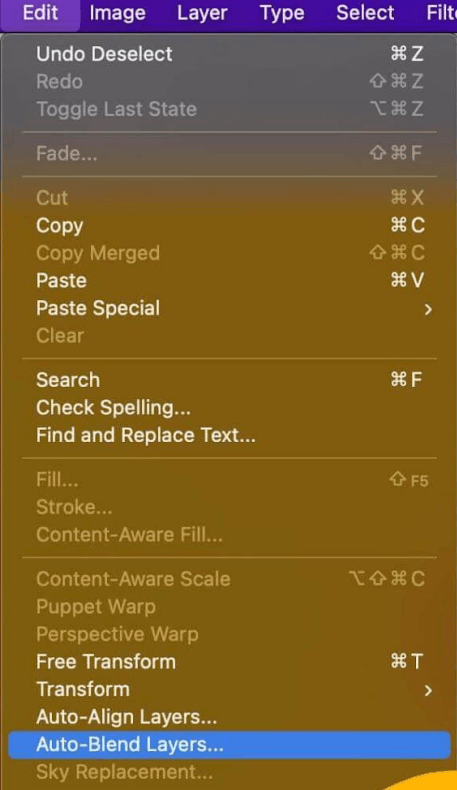
On the layers panel, select the face and body layers by holding the Shift key. You will see the drop-down menu. Click on Edit and then click Auto Blend layers.
A pop-up window will appear. On this Window, you will click on panorama. After this, you need to check seamless tones and colors and content-aware fill transparent areas. Now click Okay.
The results will be a fully merged photo. There you have it; that is how you swap faces in Photoshop.
Here is a video on how to Swap Faces In Photoshop (FAST & EASY); how to Swap Faces In Photoshop (FAST & EASY)
What is the Easiest Way to Swap Faces in Photoshop?
Photoshop is one of the best photo editing tools that you can rely on for face swapping. Now, Photoshop may have numerous tools that you can use to edit your photos.
However, face swapping only requires you to use tools like the Lasso tool and other tools within Photoshop. The steps we have outlined above can help you swap faces in Photoshop, even if you are doing it for the first time.
How do you replace a face in a picture with another face?
This question is the direct translation to face swapping. There are many reasons why you may need to face a swap. One of the main reasons is when you are not satisfied with the photo you have just taken. You can replace the face instead of doing away with the entire photo.
Photoshop enables you to do a face swap using your Windows or Mac PC. You don't have to be a professional; you can do it by simply following the guide we have outlined.
How do you do a head swap in Photoshop?
A head swap may be a bit different from a face swap. This means that you may want to entirely replace the head of a person in a photo with another head.
In Photoshop, this is possible by following the same guide we shared. However, for a head swap, you may have to select the whole head instead of only the face.
This means that instead of highlighting only the eyes, cheekbones, eyebrows, and lips, you may have to highlight the entire head. When face swapping, you are not allowed to touch the edges of the face, but on head swapping, you may need to highlight even the hair.
How do I edit faces in Photoshop? - Imagewith.ai Tools
Editing photos in Photoshop is quite easy, and anyone can learn how to do it. Photoshop allows you to swap faces, remove a photo background, or even remove unwanted objects from a photo.
All these editing tools may require you to follow a specific step-by-step guide. Some may consider these steps quite long and tiresome. Luckily, Al Image Editor is an AI photo editing platform that enables you to edit photos without following a strong process.
Al Image Editor has three main tools that help you easily edit photos. With just a click of a button, these tools will edit your photos according to your needs.
The site is also available online, which means you don't have to download it. It is also super affordable since you can choose to edit photos using credits. If you are not editing a bunch of photos, you can use the free version, where you can have a limit to the number of edited photos.
Here are the three tools that Al Image Editor offers;
-
Imagewith.Ai Overscale - when you want to improve the look of your photos, you can use this tool. You can improve the resolution and the overall quality of the photo two to four times better.
-
Imagewith.Ai Outcut - if you have photos with an unwanted background look, you can use Outcut to remove it. You can then replace the background with a plain color or a background of your choice available on the platform. You can do this in only a matter of seconds. Just one click, and you can replace the background of a photo with a better one.
-
Image with AI ClearOff - With this tool, you can get rid of unwanted objects from a photo. For example, if there is a car in your photo, you can simply tap or draw over the car and get rid of the car from your photo.
To use all these tools, you can simply head over to the official site, click on Menu, choose from the drop-down list, and choose the tool you want to use.
After choosing the tool, you only need to follow the on-screen prompts to start editing your photos.
Final Words
Editing photos is no longer a job only a professional editor can do; a total newbie can also do it. You can easily learn how to swap faces in Photoshop without having to take a whole course.
If you feel that Photoshop might be complicated in terms of other photo editing needs, like a change of background, you can choose another tool. For instance, Imagewith.Ai can greatly help if you want to improve the quality of your photos, change the background, or remove any unwanted objects from a photo. You can do all of this in one click, and it's affordable.


